Soil Sampling


What do you need today?

Soil Sampling Guidelines

Learning about your soil profile is important to grow good quality forage and responsibly manage on farm nutrients.

By analyzing soil nutrient levels, and pH, farmers can make informed decisions about fertilizer application, ensuring that crops receive the optimal nutrients for healthy growth. This not only boosts forage quality and yield but also reduces the risk of over-fertilization, which can lead to runoff and nitrates leaching into groundwater. Effective soil management helps maintain soil health, supports sustainable farming practices, and protects local water resources, benefiting both farm productivity and the environment. By knowing the nutrient levels in the soil through sampling, farmers can implement practices to reduce environmental impact, such as adjusting fertilizer application rates and timings.
 
Proper soil sampling helps determine the nutrient levels in the soil. This information allows farmers to apply the appropriate amount of nutrients, avoiding over-application, which can lead to nutrient runoff, or under-application-which can lead to poor yields.

Also regular soil sampling will provide information on soil health. Soil health is critical for crop productivity and sustainability. Soil sampling analysis allows a farmer to monitor soil health indicators such as organic matter content, soil structure, and microbial activity which aids in making informed decisions about soil management practices.

Soil Sampling Steps


Taking a proper soil sample on a livestock farm field involves several steps to ensure accurate results:
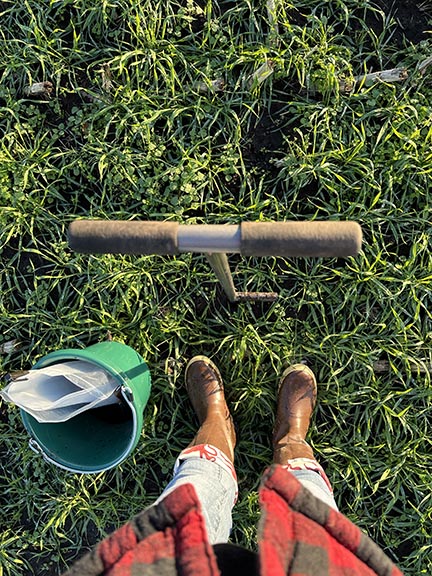
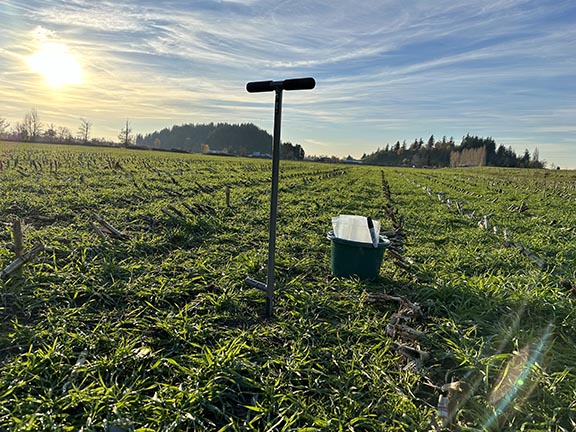
 
Materials Needed:
Clean plastic bucket or container
Soil sampling probe
Clean sampling bags
Permanent marker
GPS device or accurate field map (optional but helpful)
Steps to Take a Soil Sample:
Choose Sampling Points: For smaller fields, less than 20 acres, randomly select sampling points. For larger fields, divide the field into zones that have uniform soil characteristics such as soil type, slope, past management history, and crop rotation. Each field or zone should not exceed 15-20 acres unless it has the same soil type and field characteristics. A minimum of 15-20 sampling points per field or zone is recommended to get a representative sample. Use a GPS device or a detailed field map to mark the exact locations of these points for future reference.
Prepare Sampling Tools: Ensure that your soil sampling probe is clean and free from any contaminants that could affect the sample. Use a clean plastic bucket or container to collect soil samples from each point.
Collect Soil Samples: At each sampling point, remove the top inch of any surface debris such as crop residue or rocks. Insert the soil sampling probe or auger into the ground 12 inches (or to the appropriate depth for specific sampling needs). Collect soil cores from multiple points within the sampling zone to a depth that represents the root zone of the crops. Remove the cores using a screwdriver into the bucket.
Mix and Prepare Composite Sample: Combine soil cores from each sampling point into the clean plastic bucket or container. Thoroughly mix the soil to create a composite sample that represents the entire sampling zone.
Fill Sampling Bags or Containers: Fill clean sampling bags or containers with the mixed soil from each sampling field (or zone). Label each bag or container clearly with a permanent marker, indicating the field or zone and sampling point information (ie: field/zone number, date, location or GPS coordinates,).
Repeat for Each Field: Repeat previous steps for each designated field (or zone within the field) until all fields are sampled.

Soil Sampling Guidelines


Important Guidelines to Remember When Soil Sampling:

Post Harvest Nitrate soil samples must be collected before 3-5 inches of cumulative precipitation (with using a start date of September 1st).

Collect soil samples for the postharvest nitrate test as soon as possible after final harvest. Do not sample fields that have received manure or lagoon water application within the last 30 days.
Samples must be taken before heavy fall rains move nitrate below the 12-inch depth. Because the timing of fall rainfall is unpredictable, the best strategy is to sample fields before the 3-5 cumulative inches of rain (from Sept. 1) or Oct. 15.

Consider These Guidelines for the Timing of Soil Sample Collection

  • Sept. 1 is used as start date for tallying fall precipitation.
  • For loam, clay loam and clay soils, collect samples before 5 inches of rainfall accumulate.
  • For sand, loamy sand or sandy loam soils that have a lower water-holding capacity, sample before 3 inches of rainfall accumulate.
  • Late-season irrigation (after Sept. 1) is another factor in choosing a target date for soil sampling. When irrigation is applied after Sept. 1, the cutoff date for postharvest nitrate sampling will be earlier.

The WSDA has Soil Sampling Equipment Available for Your Use


The WSDA has soil sampling equipment for you to borrow to take accurate soil samples. Your test results are only as good as the sample you submit, so please contact your WSDA inspector if you would like to use this equipment. We have the following available to loan out:
  • Compacted soil sampler kit with 5 gallon bucket, metal plate, bungee cord, 24 inch auger bit with drill bit extension
  • 12 inch sample step soil sampler probe
  • Drill kit (battery and battery charger)

Video Tutorial- Effective Methods to Take Accurate Soil Samples


In this step-by-step "How to Soil Sample" video, we’ll quickly guide you through the process of taking accurate soil samples on your dairy farm. We’ll cover everything from choosing the right locations and tools to collecting and handling samples, ensuring you get reliable data for effective nutrient management.
 

Watch the video

Accredited Laboratories for Soil Testing

Below are some laboratory recommendations to analyze soil samples. You are welcome to use any laboratory of your choice, including labs that are not listed below. Visit the laboratory websites to print out manure sample submittal forms. Also, you can call and request that they send you sample submittal forms and/or bags and preaddressed shipping sleeves (in most cases, free of charge when you open an account).

Soil test laboratories (Moses Lake, WA): www.soiltestlab.com / 509-765-1622 [Indicate Test Grp Package S-17, Dairy Fields East or West for minimum soil testing every 3rd year WSDA requirements]

Kuo Testing Laboratories (Othello, WA and Umatilla, OR) Soil Analysis | Kuo Testing Laboratories | 509-488-0112 | (Indicate test grp package: Dairy Fields East of the Cascades or Dairy Fields West of the Cascades for minimum soil testing every 3rd year WSDA requirements) 

Midwest laboratories (Omaha, NE):  www.midwestlabs.com / 402-334-7770

Western Laboratories (Parma, ID): www.westernlaboratories.com / 208-649-4360

A & L Western Laboratories (Portland, Or and Modesto, CA): www.al-labs-west.com Portland: 503-968-9225


Sending Samples to the Lab


 Seal the sampling bags or containers securely to prevent any spillage during transportation. Include a printed analysis request form from the lab your using, marking which profiles and/or analysis you are requesting. The WSDA requires Nitrate to be tested each year and a complete soil analysis (including phosphorus) every three years. Please note Western and Eastern Washington use different tests for Phosphorus analysis, so be sure to indicate your location.   


Keep Soils Chilled During Temporary Storage and Transit


After soil samples are collected and labeled in a bag, make sure samples are cooled in the refrigerator or cooler until they are shipped to the lab. Also, be sure to send samples with ice packs or double bagged Ziploc bags full of ice to the lab to stay cool in transit. Keeping soil samples cooled and chilled during transportation to the lab is vital for accurate analysis. High temperatures can cause microbial activity and chemical changes in the soil, potentially altering nutrient levels and composition before testing. By refrigerating the samples until they are shipped, you preserve their original state, ensuring reliable and precise results when they reach the lab. Proper handling minimizes errors and helps in obtaining accurate data for effective soil management decisions.


If you need more information or assistance with soil sampling, please visit the WSDA DNMP Contact Information page to find your regional inspector.